 Months ago, when researching HOW to install acrylic windows with SIKA 295UV – Captain Pat ended up having a conversation with the Sika Eastern Seaboard Tech Rep. aka…Mr. Sika himself.
During this conversation we learned:
1. No person or boat yard in the mid-Atlantic is certified in properly installing Sikaflex
2. Any boat yard that tells you they know how to install Sika – knows about as much as you do
3. We have just as much chance at being successful in installing our own boat windows with Sika – as the nearest boat yard that wants to charge you $100 per hour for labor.
By reading and printing installation instructions provided by Sika, and tapping the knowledge of our Acrylic man Greg at Precision Plastics – we were fairly confident that:
a) we could follow directions as good as anyone else
b) it was now time to roll up our boat sleeves – and create a Sika certifi-able windows installation.
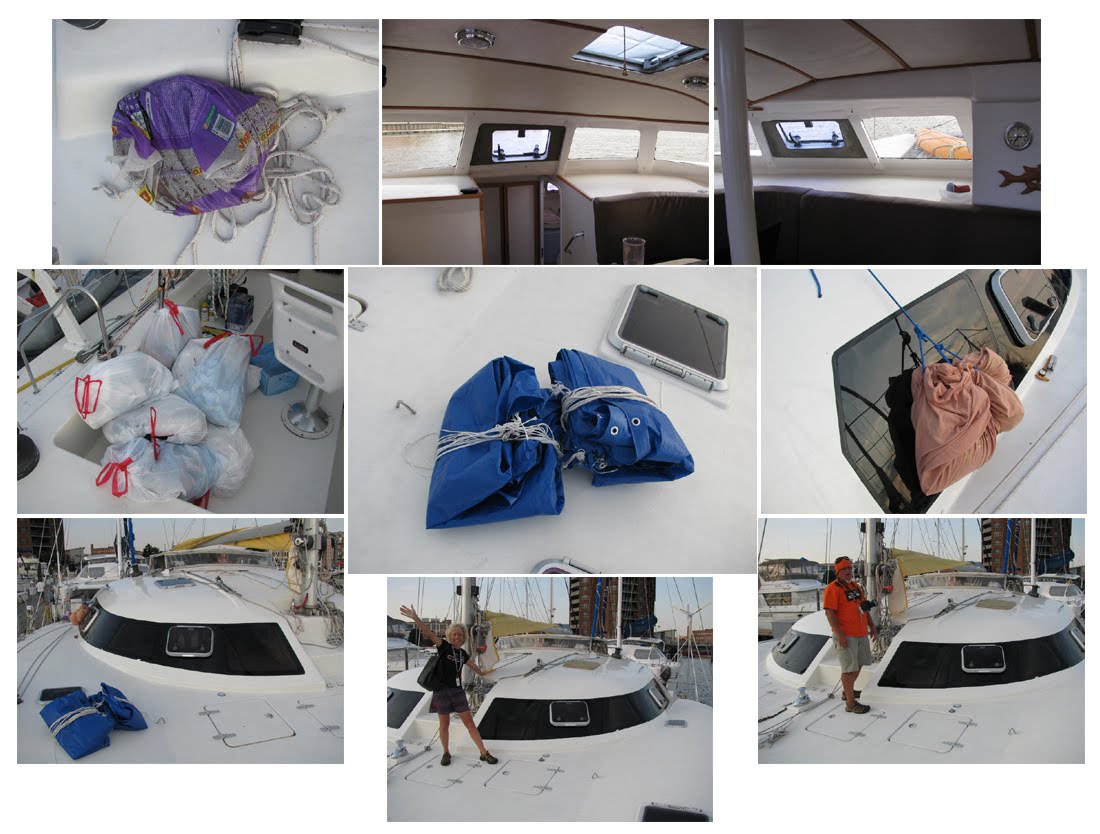
One minor detail. The windows that we had fabricated by Precision Plastics – did not fit. It appears that the new design change (adding hatches and fiberglass work), plus subtle changes to the shape of the acrylics once removed from our boat – resulted in new windows that were sized too large.
The discovery of the OVERSIZED windows occurred the day that Captain Pat went offshore with a crew doing a boat delivery – and was unreachable. This meant I was in charge. This meant that I made technical decisions for Cat Maudy. This job is far above my pay grade. I couldn’t imagine what to do. I have Clifton at Tidewater saying that the windows don’t fit….and Greg at Precision Plastics telling me we would have to make a whole new mold. Making a mold is out of the question. If the mold from the old windows was no good — we just didn’t have the expertise to make it any better. So, I did what any Captain Jane would do. I became very blonde, and begged Greg to help a damsel in distress.
Greg agreed to come to visit our boat and windows, and make a recommendation. What a lovely man. I waited patiently that afternoon for his arrival. Within 2 hours of my frantic phone call – Greg arrived to inspect the windows and offer his feedback. “These aren’t so bad” he commented. “We can fix this”. Music to my ears. We mark up the new dimensions for the windows – and place all 8 windows in Greg’s van. He has to re-fabricate…now we wait 2 weeks for the windows to be refitted.
By now, Captain Pat has returned back from his boat delivery, and we depart from Tidewater – to return back to our home port in Anchorage Marina. We wait….and wait….and finally – the windows are READY.
The weekend before my Iron Girl triathlon event, turns out to be a weather window that will be perfect for installing sikaflex. No rain…hot…humid…but no rain. I finish my athleta-workouts by 8:30 am…and back at the boat by 9AM to begin the Sika install process.
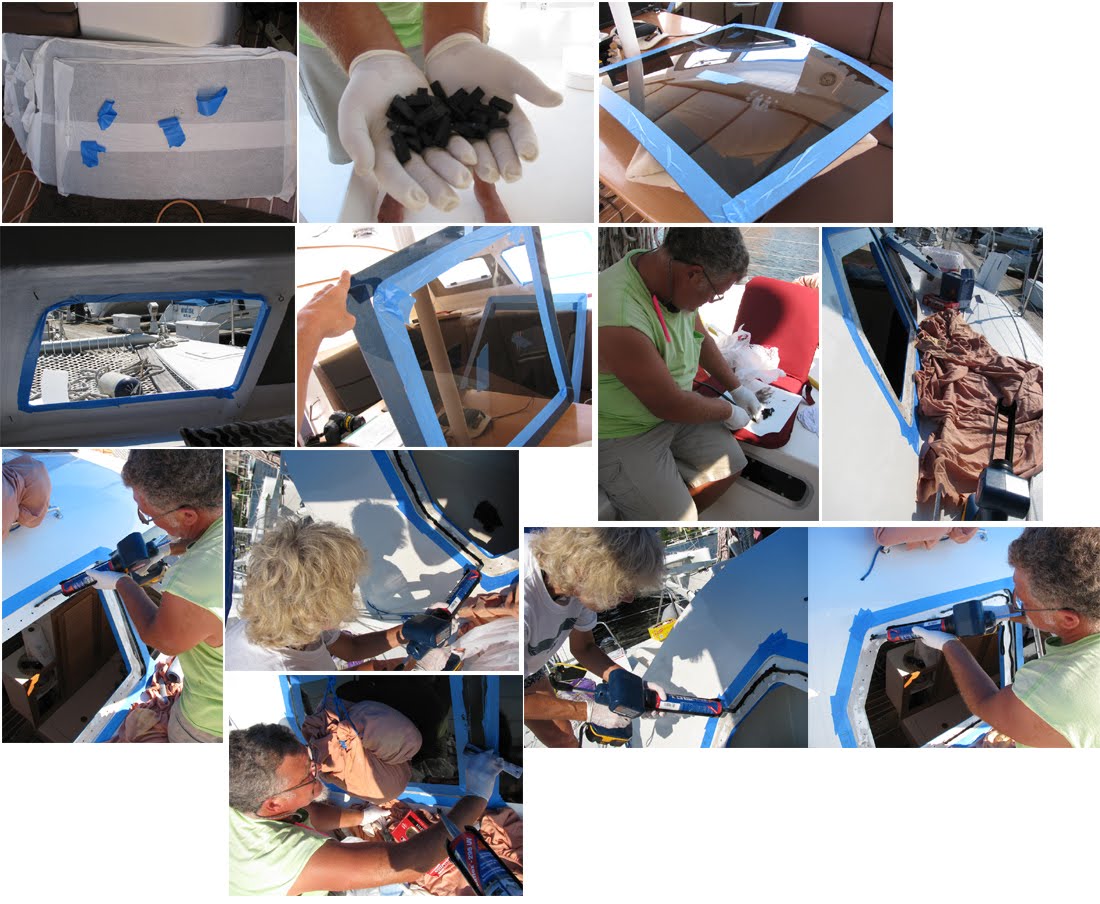
The PROCESS for installing sikaflex windows is ALL consuming. Here is a recap
- remove all tape and plastic around each window that was used for months to keep out the rain
- use special adhesive remover to make sure not a smidge of adhesive is left
- wipe the perimeter of each window down with alcohol
- tape the inside fiberglass…and outside fiberglass frame for each portal
- tape the inside window boundary and outside window boundary
- paint fiberglass primer anywhere the sikaflex would be applied
- rub the window border with scotch brite to rough it up
- wipe down the window border to remove any scotch brite residue
- paint special black paint primer on the acrylic anywhere the sikaflex would be applied
- wait 30 minutes for the paint to dry
- create a V shape in the nozzle used to form the sikaflex bead
- have a LOT of latex gloves handy
- have a garbage bucket handy – sika is very messy
- fire up your battery powered electric caulk gun (do not try to use a hand caulk gun!)
- insert the sika tube
- make 3 line beads on the fiberglass
- take your black SIKA spacers that you made months ago – and stick them in various key spots along the sika bead – so that when you apply pressure, you will have an even space between the window and the fiberglass
- use pre-made starboard spacers (sika won’t adhere to these) positioned at the base of each window – so that gravity won’t let the window slide down
- carefully place the window to the Sika – so that it adheres. Push around the entire border
- grab that tube of Sika…and start backfilling
- smooth out the backfill so that there are no gaps for water to leak in
- pull the tape off the borders VERY CAREFULLY (inside and out) and don’t let any sika land on the fiberglass or acrylics
- admire your work for about 10 seconds
- repeat all of the above for 7 more windows – with a few exceptions…
- IF the window seems to bow a bit…wrap up a bag of mulch from your local Home Depot in a soft cotton sheet…tie this up so that it can lay on the window without touching the sika
The boat must now sit at the dock for 7 days – while the sika “cures”. I’m very glad to sit – well, not really – I have to get in my final few days of training for the Iron Girl. At least I’m not bending over in awkward positions squirting out sika beads. We quickly remove all blue tarp remnants.
9/6/2009 Update: The true test – is the window LEAK test. By now 3 weeks have passed since the sika installation. We haven’t had ONE itsy bitsy leak, and we have sailed and put stress on the boat. So, I am feeling sika “certified” or at least sika “qualified” and would be happy to give boat yards advice on properly installing sikaflex. For $100 per hour of course!